14 X 14 Square Gazebo Building Plans Free Download
14×14 Free Continuing Pergola – Gratis DIY Plans
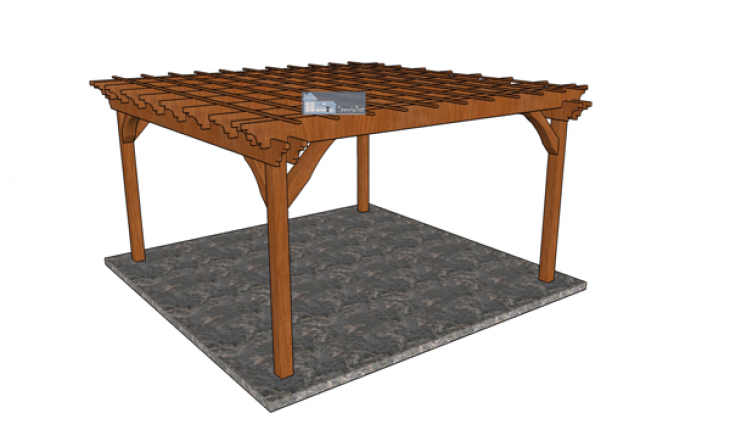
This step by footstep diy woodworking projection is near fourteen x14 pergola plans. This foursquare pergola features a modernistic blueprint and a very sturdy construction. You can build this free continuing pergola with bones tools and have a beautiful place for serving dinner and outdoor hangout. Think that you demand to read the local building codes before starting the construction, so you comply with the legal requirements. You tin add your personal touch by choosing the rafter ends pattern, too as the spacing of the top slats.
I recommend you to invest in the all-time materials you could afford. Therefore, y'all should buy weather-resistant lumber, such as pine or cedar. E'er have authentic measurements before adjusting the size of the components at the proper size. Drill pilot holes trough the components earlier inserting the forest screws, to prevent the woods from splitting.
Made from this plan
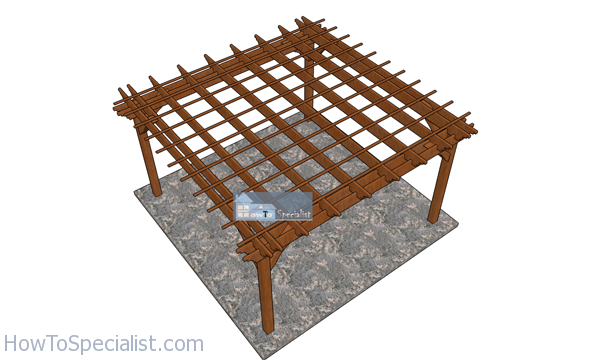
14×xiv Gratis Standing Pergola – Gratis DIY Plans
Building-a-14×fourteen-pergola
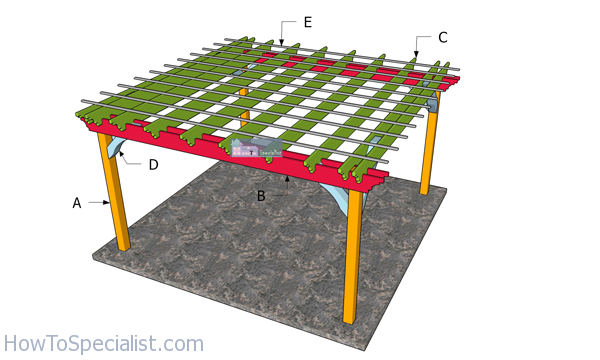
Materials
- A – 4 pieces of 6×6 lumber – 8′ long POSTS
- B – 4 piece of 2×10 lumber – sixteen′ long Support BEAMS
- C – x pieces of ii×ten lumber – 14′ long SHADE ELEMENTS
- D – 4 pieces of 6×6 lumber – 43 iii/4 long, 4 pieces – 36″ long BRACES
- E – xi pieces of 1×two lumber – xvi′ long Superlative SLATS
- fourteen pieces of 2×x lumber – xvi ft
- xi pieces of 1×2 lumber – sixteen ft
- vi pieces of 6×6 lumber – eight ft
- 2 pieces of 6×six lumber – 12 ft
- 1 5/eight″ screws
- 3 i/2″ screws
- 5 1/two″ screws
- ane i/2 structural screws
- vi×vi post anchor
- mail service to beam connectors
- tube form
- rafter ties
- 8 pieces of 9″ carriage bolts
- wood filler , wood glue, stain/paint
Tools
- Safety gloves, glasses
- Miter saw, jigsaw
- Chalk line, tape measure out, spirit level, carpentry pencil
- Drill machinery and drill bits
Fourth dimension
- 1 Week
How to build a 14×14 pergola
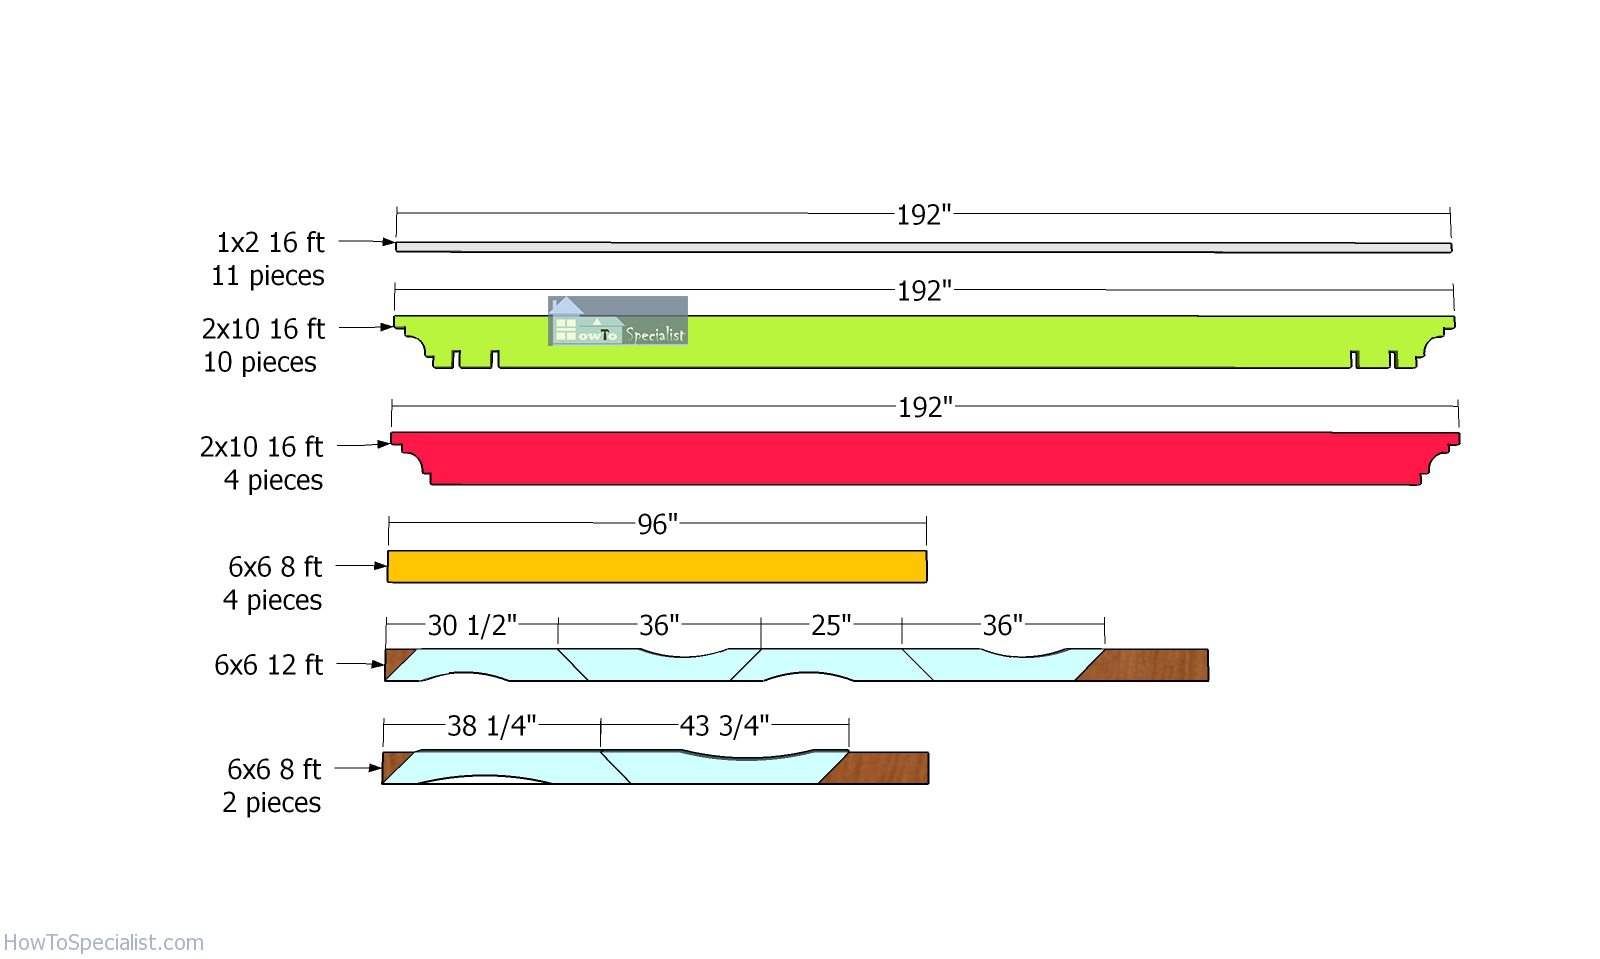
Cut-list—14×xiv-pergola
First of all, y'all need to cut the components for the pergola. Make sure you measure twice and cutting once. Mark the cut lines and get the job done with a miter saw.
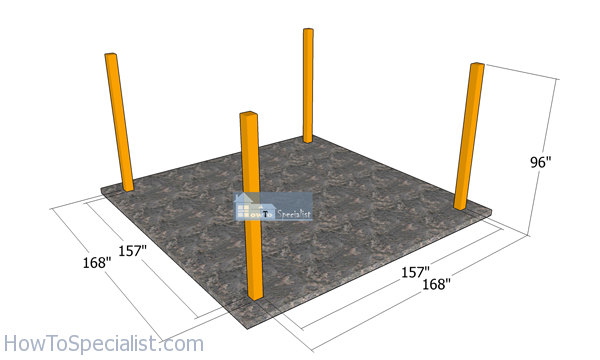
Laying-out-the-posts-for-the-pergola
Next, you need to layout the garden square pergola. Therefore, utilize string and batter boards to lay out the location of the posts. Measure the diagonals and make adjustments till they are equal. Moreover, you lot need to use the 3-four-5 rule to each of the 4 corners, and so y'all make sure they are right angled.

Fitting the posts
You can set the 6×half-dozen posts in concrete or you can cascade footings and secure them in identify with anchors. Dig ii-three′ deep holes and xiv″ in diameter and so compact a layer of gravel to the bottom. Fit the 12″ tubes and set the vi×6 posts into identify (or fit the anchors).
Set the anchors, pour the concrete in the tube forms and let it dry out for several days. Recall that in my case, the plans are designed because you will lock the posts using anchors. If yous programme to lock the posts in physical, just add together three′ to all the posts.
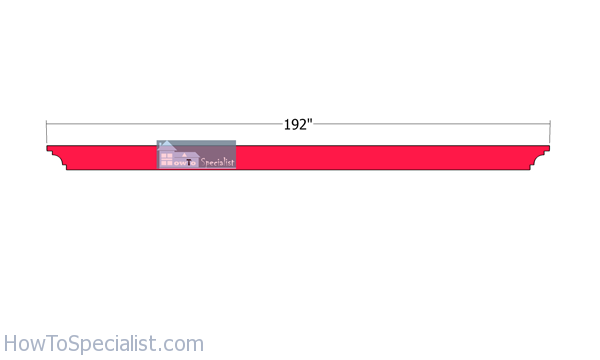
Support-beams
Apply 2×10 lumber for the support beams.

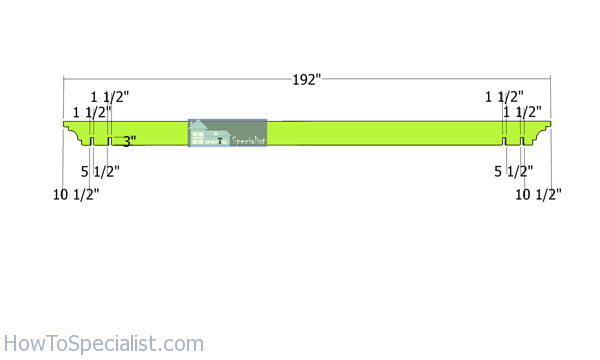
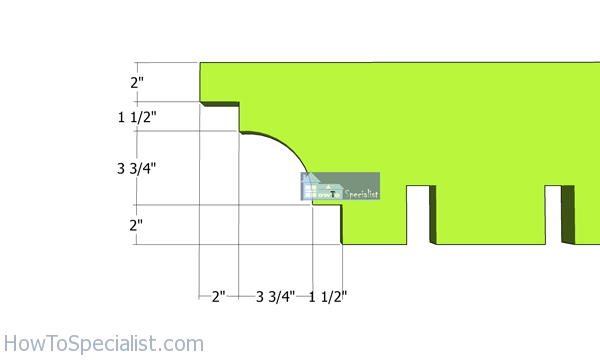
Decorative-ends-for-support-beams
Mark the cut lines to the beams and get the job done with a circular saw and a jigsaw. Polish the edges with sandpaper. Y'all should notice that the components are fabricated from different materials.
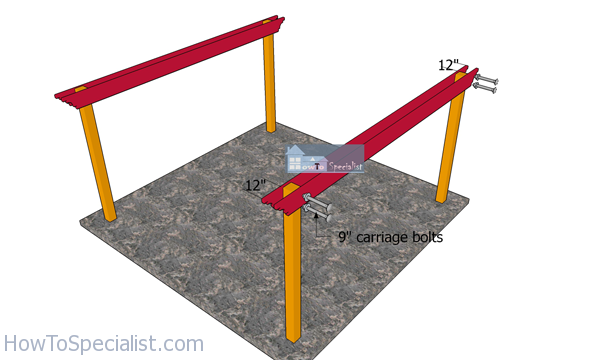
Fitting-the-support-beams
Marshal the support beams to the posts then clamp them into identify tightly. Use a spirit level to plumb the posts and to check if the beams are perfectly horizontal. Notice the equal overhangs on both ends of the back up beams.
Drill airplane pilot holes through the half-dozen×6 posts and through the beams. Insert 9″ carriage bolts (two for each joint) and lock everything tightly. Make sure the beams are horizontal and check if the corners are square.
Building-the-rafters
Use 2×10 lumber for the rafters. Mark the cut lines for the slots and go the job done with a circular saw. Mark parallel cuts inside the marked areas then clean the recess with a chisel.
Rafter-ends
Mark the cut lines to both ends of the beams and get the chore done with a jigsaw.
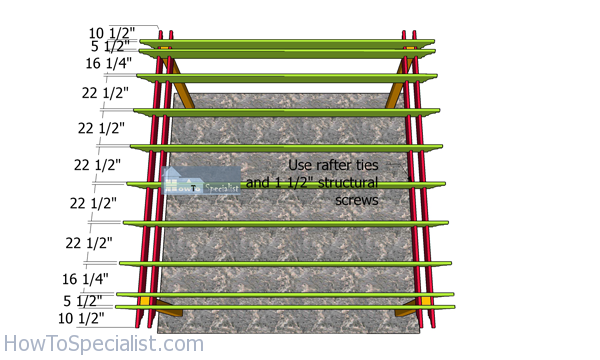
Fitting-the-pergola-rafters
The side by side step of the project is to fit the 2×x rafters to the pergola, as shown in the diagram. Exit 12″ overhangs on both ends of the beams. Place the rafters every bit spaced and secure them to the back up beams with rafter ties and ane ane/2″ structural screws.
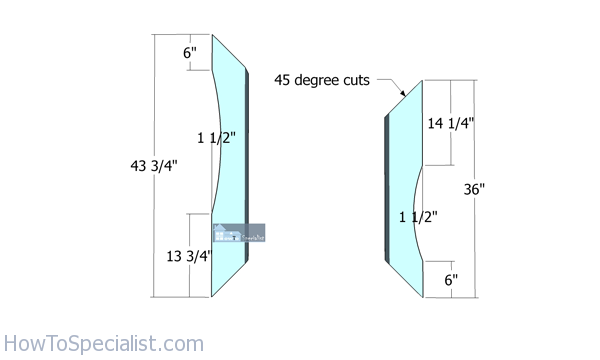
Braces-for-pergola
Use 6×6 lumber for the diagonal braces. Utilize a miter saw to make 45 degree cuts to both ends of the braces.
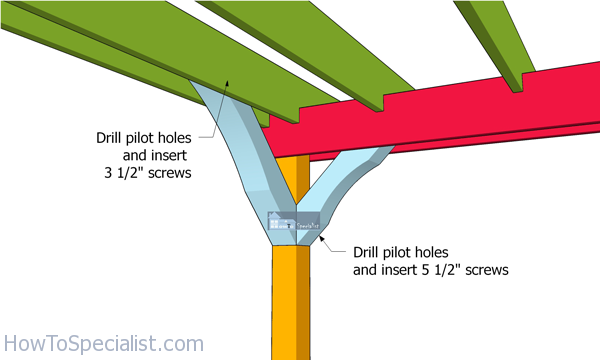
Plumbing fixtures-the-braces—14×14-square-pergola
Fit the braces to the pergola, as shown in the diagram. Drill airplane pilot holes through the beams and insert 3 1/2″ screws to lock them into identify. Drill pilot holes through the braces and insert v 1/ii″ screws into the posts. Before setting the braces, plumb the posts with a spirit level.
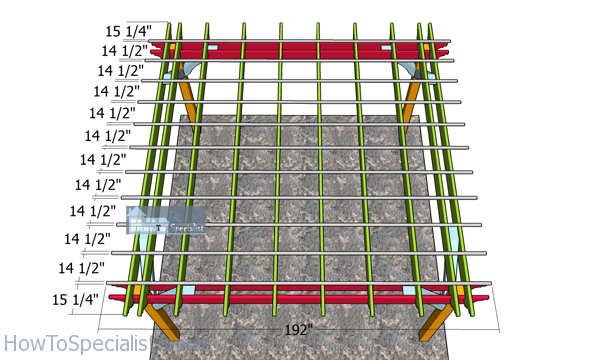
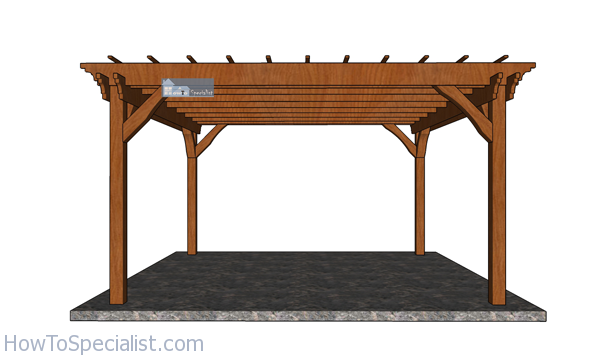
Fitting-the-top-slats
Fit the 1×two slats to the roof of the pergola. You can adapt the size between the shade elements, so you let more or less calorie-free to the covered area.
Build-a-pergola
This free standing pergola is sturdy and it features an elegant pattern. Yous should select the location for the pergola equally to add near value to your property.
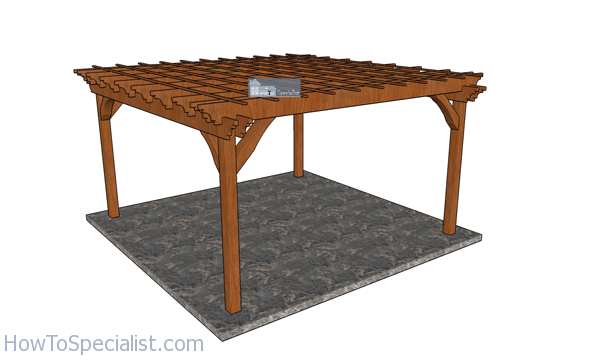
How-to-build-a-14×14-pergola
Last but not to the lowest degree, yous need to take care of the finishing touches. Fill the holes with wood putty and then polish the surface with sandpaper. Utilise a few coats of paint or stain to enhance the look of the components and to protect them from the elements.
xiv×14-free-standing-pergola-plans
This 14×fourteen pergola is big enough for creating a really nice relaxation expanse in the lawn. With so much space yous can fit a tabular array, a few chairs and even a sofa. If you like my project, don't forget to SHARE it on Facebook and Pinterest. See my other pergola plans, too, for more building inspiration.
Become PDF Plans
Give thanks you for reading our project about free xiv×14 pergola plans and I recommend yous to check out the residue of the projects. Don't forget to Similar and SHARE our projects with your friends, by using the social media widgets. SUBSCRIBE to be the first that gets our latest projects.
Related Posts
DOWNLOAD HERE
Posted by: salazarwhermar.blogspot.com


0 Komentar
Post a Comment